
Networed printers in schools and centres will be able to scan paper past papers and prelims to PDF. The main advantage of scanning to PDF is that the digital copy looks very similar to the original paper version - unlike scanning and converting to Microsoft Word, for example, where pages with lots of graphics usually look a mess.
Once you have a PDF you can either open and edit it in Word or in Acrobat Pro. Opening it in Word usually means that the formatting and layout are damaged - with Acrobat Pro it looks like the original and you can edit it.
Scanning with Acrobat Pro
Acrobat Pro also has a built-in tool for scanning and converting paper documents into PDF.
Before you start, make sure your scanner is connected and working.
There are 5 scanner presets that you can use when scanning a document. You can configure each to better suit your needs:
- Autodetect Color Mode
- Black & White Document
- Grayscale Document
- Color Document
- Color Image
To configure, start Adobe Pro and then:
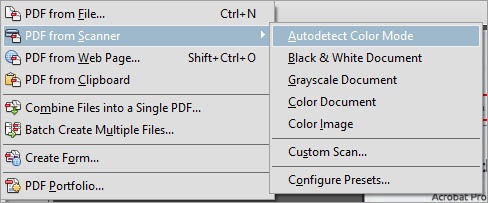
- Select 'File' from the top menu and then 'Create'.
- Then 'PDF from Scanner' and select 'Configure Presets'.
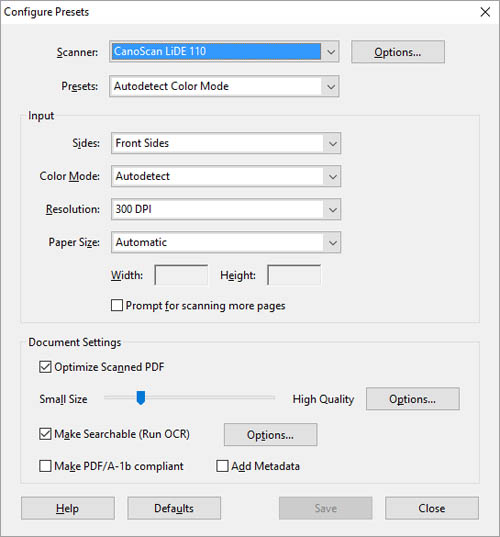
- Choose the 'Preset' from the 'Presets' you wish to configure.
- Set the 'Paper Size' size to 'Automatic' or 'A4'.
- Select your scanner form 'Scanner' and then click on 'Options'.
- Set the 'User Interface' to 'Hide the Scanner's native interface'.
Step 6: Allows you to use Acrobat to control the scanner.
Next:
- Set the 'Color Mode' to suit the document your going to scan:
- Autodetect - to let Acrobat decide what colour mode to use;
- Black and White - for most monochrome documents;
- Greyscale - for documents with monochrome pictures;
- Color - documents for textbooks or other printed items with colour.
- Leave the 'Resolution' at 300dpi.
- Make sure that 'Make Searchable (Run OCR)' is ticked and click on 'Options' next to it.
- Set the following:
- 'Primary OCR language' to 'English (UK)';
- 'PDF Output Style' to either 'Searchable Image' or 'ClearScan'.
- Click 'Save'.
Should the PDF output be 'Searchable Image' or 'Editable Text and images'?
Searchable Image
creates a PDF that looks like the original page, and the recognised text is an invisible 'layer' over the page.
Editable Text and images
puts a text layer on top of the page in a font chosen by the program to match the original. The text is usually clearer than a PDF made with Searchable image. The disadvantage is that the text font may look slightly different to the original paper copy.
We recommend using ClearScan because:
- the text of the end result looks much cleaner;
- when you view the PDF in Adobe Reader you can usually change the page background and text colours using the Accessibility Preferences (if you scan and save a 'Searchable Image' you'll find the page background colour can't be changed);
- the file size is much smaller than a Searchable Image scan.
Scanning with OCR
Optical character recognition (OCR) is the electronic conversion of images of handwritten or printed text into computer-encoded text.
Scanning process:
- Place the first page on the scanner.
- Select 'File' from the top menu and then 'Create'.
- Then 'PDF from Scanner' and select your configured preset, i.e. 'Autodetect Color Mode'.
- The scanner will now scan the page and convert it to text (OCR process) and a PDF of the page will appear in Adobe Pro.
- Repeat process with the rest of the pages.
The quality of the end result depends very much on the quality of the original paper document - if it is a tenth generation dog-eared photocopy with faint text and marks all over it, you are unlikely to get very good results. But if it is a reasonably good clean sheet it should come out quite well.
If you get poor results try increasing the resolution or the scanner settings (600dpi). Look in the Adobe Help files for hints and tips.
Correcting OCR errors with third party software
Acrobat Pro X and above let you see and correct OCR errors and seem to produce more accurate scanned copies. However, the big problem with Acrobat Pro 8 and 9 is that you can't see the errors when the text is converted, or edit the text. This means you can't tell if it's not recognised accurately, and you also can't fix it.
If you want to make sure your scanned copy is 100% accurate you should get Acrobat Pro X or XI, or buy a scanning and OCR program like FineReader Pro or OmniPage (both about £70). Both these programs let you edit and correct any mistakes, and can save the scanned files as PDF and Word documents. FineReader is also better at converting PDFs to editable text than Acrobat.
Your scanner may come with basic scanning and OCR software but we recommend getting FineReader or OmniPage if you're going to scan regularly.
You can buy FineReader or OmniPage from software supplier such as:
You can also download a full functioning trial version of FineReader.
 Correcting OCR errors with Acrobat Pro X and above
Acrobat Pro X and above lets you see and correct OCR errors when you scan.
You should first scan the document to create a Searchable Image (you can't see OCR errors if you scan with ClearScan).
To highlight OCR errors:
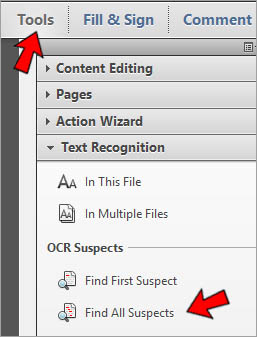
- Click on 'Tools' (right hand pane).
- Then click on 'Text Recognition'.
- Select 'Find All Suspects'.
The page will now highlight (in red) all the 'suspects'.
Click on one of these 'suspects' to check and if necessary correct the word, then:
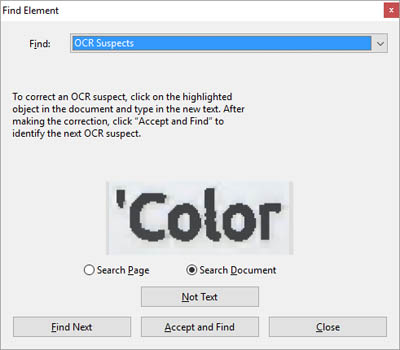
- click 'Accept'
- and then 'Find' to find the next word.
- If the word is actually an image, or is not text, click 'Not Text'.
Once you have corrected all errors, you still have a 'Searchable image' and we suggest converting it to a 'ClearScan' for the reasons given earlier.
To do this:
- Click on 'Tools' (right hand pane).
- Then click on 'Text Recognition'.
- Select 'In This File'.
- Click on 'Edit'.
- Select 'Clearscan' from 'PDF Output Style'
- Click on 'OK' and then 'OK' again.
Now save the file.


