
To Start: Open the Forms Toolbar
We will be using Acrobat Pro DC
Open your 'raw' PDF assessment with Acrobat Pro. To add answer boxes (Adobe call them 'Form Fields') you need to have the Forms toolbar on screen.
To do this:
- click on Tools > Prepare Form
- Click Start.
Acrobat will go through the paper and draw in answer boxes where it thinks you need them. It looks for horizontal lines or boxes on the page (which is why you want to add these when you make your paper with Word).
You can see the form fields it has added on each page. The answer boxes don't have a border or colours set yet,
so change the colours to your preference:
- Press 'CTRL-A' to 'Select All' the form fields,
- then hit 'CTRL-I' to open the properties for all the answer boxes.
- Set the Appearance properties: red border, no fill, Font size = Auto.
When Acrobat inserts the answer boxes it may miss some or it may put it boxes where you don't want them, so you need to go through the paper and check and edit them.
Check and set Form Field properties
You need to make sure each field has the correct properties. Hit 'CTRL-I' to show the Properties and then click on the first text form field in the paper.
1. General tab
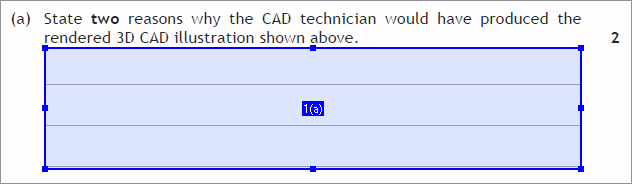
Acrobat Pro gives each new answer box a name when it inserts one into your paper. Automatic fields are often given a name from the text immediately above, e.g. ‘Town’ but for questions, the title is often not helpful so it’s good practice to change the name to match the question (e.g. 1(a), 1(b) etc).
If you are creating a paper for a visually impaired student who uses screen reading technology, it is vital to give the field a meaningful name (e.g. Question 1a) and also to copy this name to the 'Tooltip' field.
2. Appearance tab
- Set the 'Border color' to red.
- The 'Fill color' should normally be transparent, i.e. 'No Color', unless you need to cover up handwriting guielines in which case make the Fill Colour white.
- Set the 'Font Size' to 'Auto'.
3. Options tab

- Set 'Alignment' for most answer boxes to 'Left', but you may want centre alignment for tables and right for text boxes with calculations.
- Tick 'Check Spelling' - if you want the spellchecker to work in the paper.
- Tick 'Multi-line' for most answer boxes unless it really is only a single line answer that is required.
- Untick 'Scroll long text'.
- Tick 'Allow Rich Text Formatting' if you are making a paper for maths or science.
- Tick 'Comb of X characters' if you need a field that gives a fixed number of digits (e.g. the date or candidate number on the front page).
- Click on 'Close' to dismiss the 'Properties' box.
'Allow Rich Text Formatting' lets the learners format the text in the answer box and use super and subscripts (e.g. to type x2). The disadvantage is that with RTF, the number of lines of text that can be typed is fixed and so learners cannot type in more lines beyond the size of the box. Most answer boxes should not be rich text formatted because a) plain text is usually adequate to answer the question and b) candidates can type more lines in if they wish although the text size will reduce in order to fit the text into the box.
Set Current Properties as Defaults
So that all other text boxes you create from now on have the same properties:
- Right click on the text box you have just made.
- Select 'Use Current Properties as New Defaults'.
Delete unwanted Form Fields
Click on the field and press Delete on the keyboard, or right-click and choose Delete.
To delete several fields at once, use the mouse to draw across the fields and select them, then press Delete.
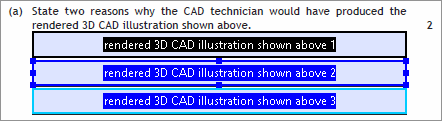
For this question we want a single answer box, so delete the bottom two.
Move and adjust Form Fields
Use the blue handles adjust the size of a box. Here we want the answer box to cover all three lines.
Change Properties where necessary
Hit CTRL-I to open the Properties and click on the field.
Most fields should be multi-line, so tick:
- Options > Multi-line
Most fields are should be transparent but some should have a fill colour so that any handwriting guides are not visible. In:
- Appearance set the Fill Color to white.
Adding Text Form Fields

- Click on the 'Add a Text Field' button in the Forms toolbar;
- Move the cursor (and hence the text field) to where you want it placed;
- Click to drop your first text field.
- Before you draw any more text fields, check and set the 'Default Properties' as above.
'Keep tool selected' checkbox
In order to save you constantly clicking the 'Add Text Field' button to add another text field, click on the 'Keep tool selected' checkbox.
This keeps the button pressed and allows you to draw one text box after another by simply clicking on the document.

Hints and Tips
- Re-size an answer box by clicking and dragging on the blue ‘handles’, and move it by clicking and dragging in the box.
- To make fine positional adjustments, use the arrow keys on the keyboard to move the box.
- Delete a box by right-clicking and selecting Delete.
- To help you draw the boxes the size you want, zoom in to say 200%. Or try turning on View > Show/Hide > Rulers & Grids > Snap To Grid and change the grid size (Edit > Preferences > Units and Guides) to help draw neat boxes.
- You can align several boxes by drawing round them to select a few, or by clicking on each with the 'CTRL' key held down, then right-click and choose the type of alignment you want.
- Click on Preview from the toolbar to check how it looks and type in some text. Click Edit to go back to editing and continue adding more boxes.
- Once you are finished remove any answers you may have added while testing by clicking Forms > Clear forms.
'Tick' Form Fields

- Click on the 'Add Check Box' button in the Forms toolbar;
- Move the cursor (and hence the check box) to where you want it placed;
- Click to drop your first tick box.
- Before you draw any more tick boxes, set the 'Default Properties' (see below).
Properties
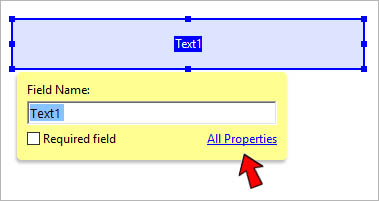
Click 'All Properties' in the dialog box, or double click on the answer box to open the Properties.
Under the Appearance tab:
- Set the 'Border color' to red.
- The 'Fill color' should normally be transparent, i.e. 'No Color'.
- Set the 'Font Size' to be 'Auto'.
Set Current Properties as Defaults
So that all other tick boxes you create from now on have the same properties:
- Right click on the tick box you have just made.
- Select 'Use Current Properties as New Defaults'.
Don't draw sets of tick boxes manually - use the 'Create Multiple Copies' tool (see below).
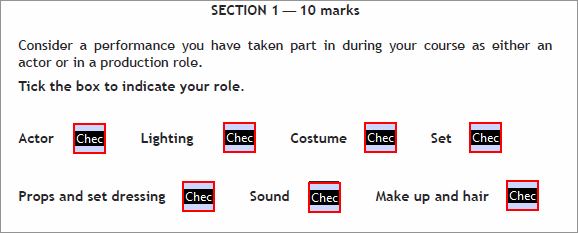
Create multiple copies
Right click on the first tick box you created you and:
- Choose 'Create Multiple Copies'.
- Type '2' into the 'Copy selected fields down' field.
- Type '4' into the 'Copy selected fields across' field.
and you should see four tick boxes inserted below the first one. You can change the size of all the boxes with the Overall size buttons, and you can move all four boxes around with the Up/Down/Left/Right buttons. Note that each of your multiple fields has been given a different name automatically.
Once you have finished adding your answer boxes, click 'Close’ at the right hand side of the screen.
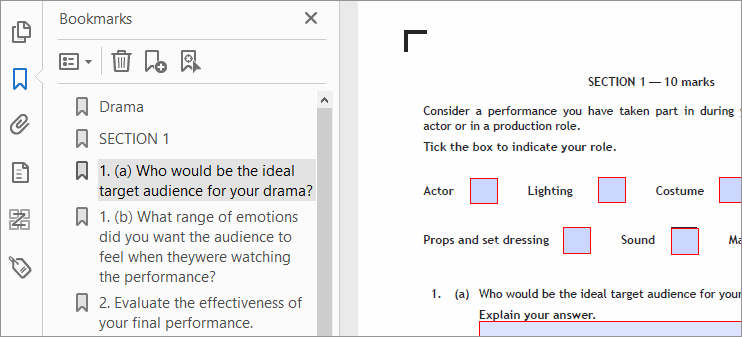
Add bookmarks
It's good practice to add bookmarks to the paper so that learners can see the structure of the paper and navigate using the bookmark panel.
If you used Heading Styles to create the paper in Word, then the PDF should already have bookmarks. If not, add them yourself.
- Click on the blue ribbon icon (left hand pane) or press F4 or View > Show/Hide > Navigation Panes > Bookmarks.
- Go to the first page of your paper and select the title.
- Press 'CTRL-B' - this will create a bookmark for the title of the paper.
- On page 2, select 'Section 1' and press 'CTRL-B' - this will add a second bookmark for 'Section 1' of the document.
- Now select the text for the first question and again press 'CTRL-B' to add a third bookmark. You can edit the bookmark text as required.
- Repeat for all the questions in the paper.
Set the file properties
Press 'CTRL-D' to open the File Properties and then:
- Under 'Initial View' tab, set the 'Navigation tab' to 'Bookmarks Panel and Page'.
- Under the 'Advanced' tab, set the Language to be 'EN-GB'.
- If you want, go to the 'Security' tab and set a password to prevent the paper being opened or edited.
Tag the PDF
In PDF files, structure is defined via 'Tags'. Tagging the PDF improves the operation of Adobe Reader's 'Read Out Loud' (text-to-speech) and Screen readers such as JAWS or VoiceOver.
- In the right hand Tools Panel click on 'Accessibility'.
- Click ‘AutoTag Document'.
Ignore the 'Recognition Report' that appears - unless you are creating a paper for a blind student using a screen reader or braille display, in which case you need to make the paper accessible for these technologies, by for example:
- Ensuring that the reading order is correct and makes sense;
- Adding ‘Alt Text’ descriptions for images.


